Máquina do tempo - Sofia Erzini
A programme that can control a machine meant for stop motion animation.
The programme is responding to camera capture, therefor each time a picture is taken motors are activated and take a step or more according to the preferences made by the programmer.
These motors are integrated in the mechanical structure that will make all the elements of light and weather change frame-by-frame.
Leaving the animator free to introduce any element according to this theme of cycle and repetition.
Scheme:
                     1
    +--------+ Camera Capture +-------+
    |                                 |
    +                                 +
 2 step motors              8 Step motors
    +                                 +
    |                                 |
    +                                 +
 3 Camera Capture            7 Camera capture
    +                                 +
    |                                 |
    +                                 +
 4 Step motors               6 Step motors
    +                                 +
    |                                 |
    +--------+ Camera Capture +-------+
                     5
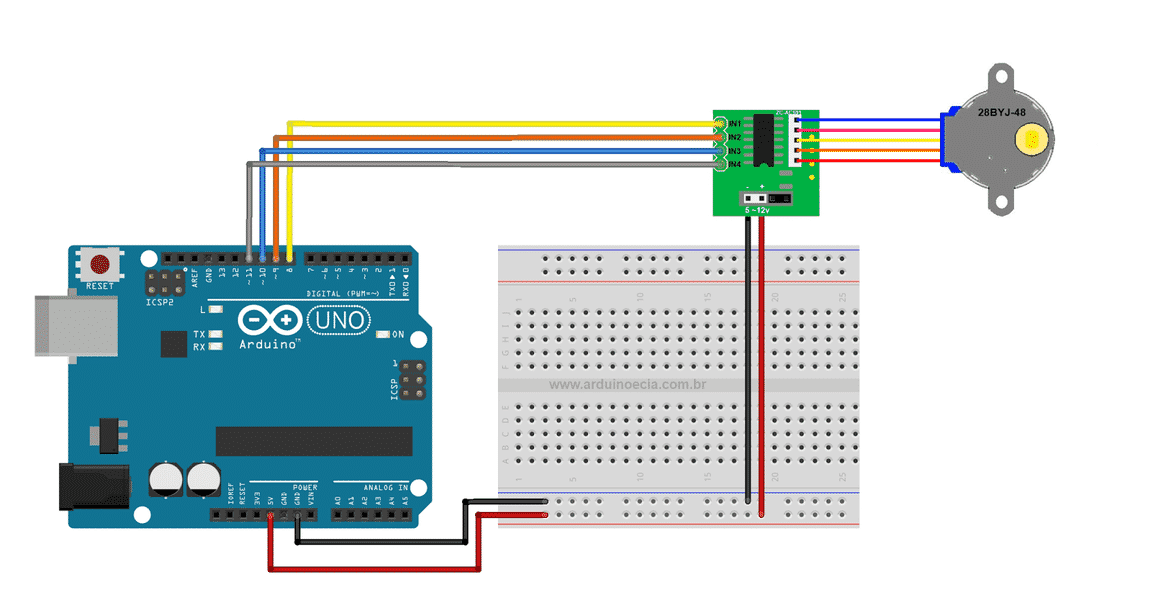
1ST STEP, control the stepmotor, back/ forward/ pause
\\The circuit diagrame of an Arduino Uno, 28-BYJ48 steper motor and a ULN2003 stepper module (driver):
\\ Using Serial Print:
The serial monitor is a practical fiture of the arduino that alows a live view in your pc (via USB cable) of the actions happening.
With serial print you can send information Live to the arduino Board, making it, in my case, rotate the motor in a "negative" or "positive" direction with any given angle. by not typing (aka printing) anything the motor will stay in place.
\\The code used*:
// Arduino stepper motor control code

#include <Stepper.h> // Include the header file

// change this to the number of steps on your motor
#define STEPS 32

// create an instance of the stepper class using the steps and pins
Stepper stepper(STEPS, 8, 10, 9, 11);

int val = 0;

void setup() {
  Serial.begin(9600);
  stepper.setSpeed(200);
}

void loop() {

  if (Serial.available()>0)
  {
    val = Serial.parseInt();
    stepper.step(val);
    Serial.println(val); //for debugging
  }


}
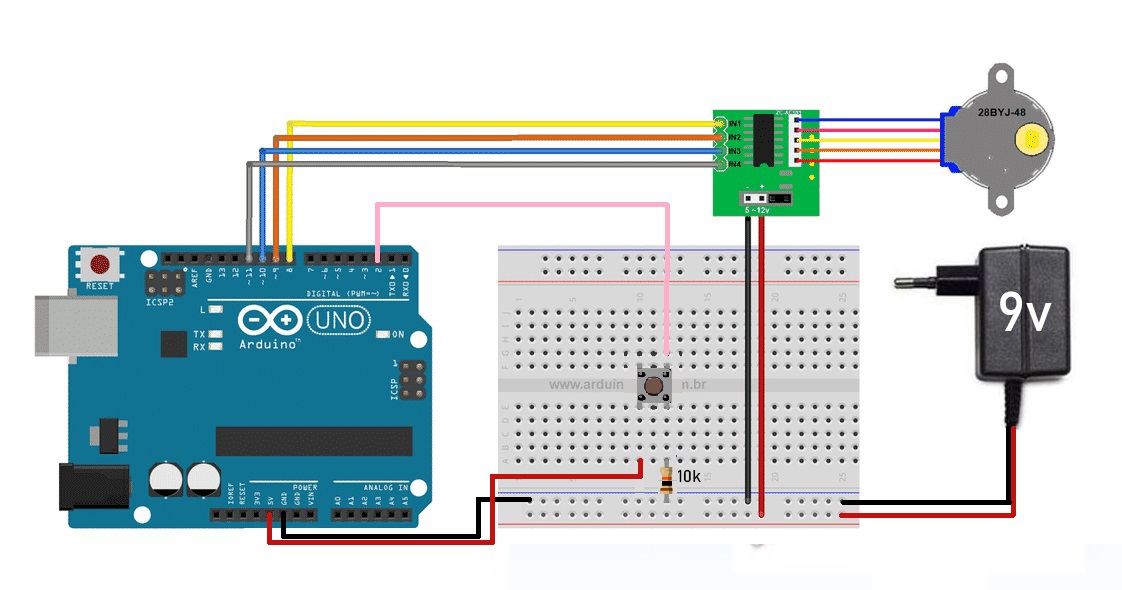
2ND STEP, A button and an external sorce ofe energie was added to the circuit.
The button representes the shot taken by the camera, this shot will activate the motor making it rotate a certain amount of degrees.
The Code used (based on**):
// Arduino stepper motor control code

 #include <Stepper.h> // Include the header file
 // change this to the number of steps on your motor
 #define STEPS 32

// create an instance of the stepper class using the steps and pins
 Stepper stepper(STEPS, 8, 10, 9, 11);

 const int camera = 2;
 int pictureTaken;
 int buttonState = 0;

 void setup() {
   Serial.begin(9600);
   pinMode(camera, INPUT);
   stepper.setSpeed(200);
 }

 void loop() {

  buttonState = digitalRead(camera);

  if (buttonState == HIGH) {
    Serial.println("Motor On!");
    pictureTaken = 250;
    stepper.step(pictureTaken);
delay (5);

  }

  else {
    Serial.println ("Motor Off!");

 }

}
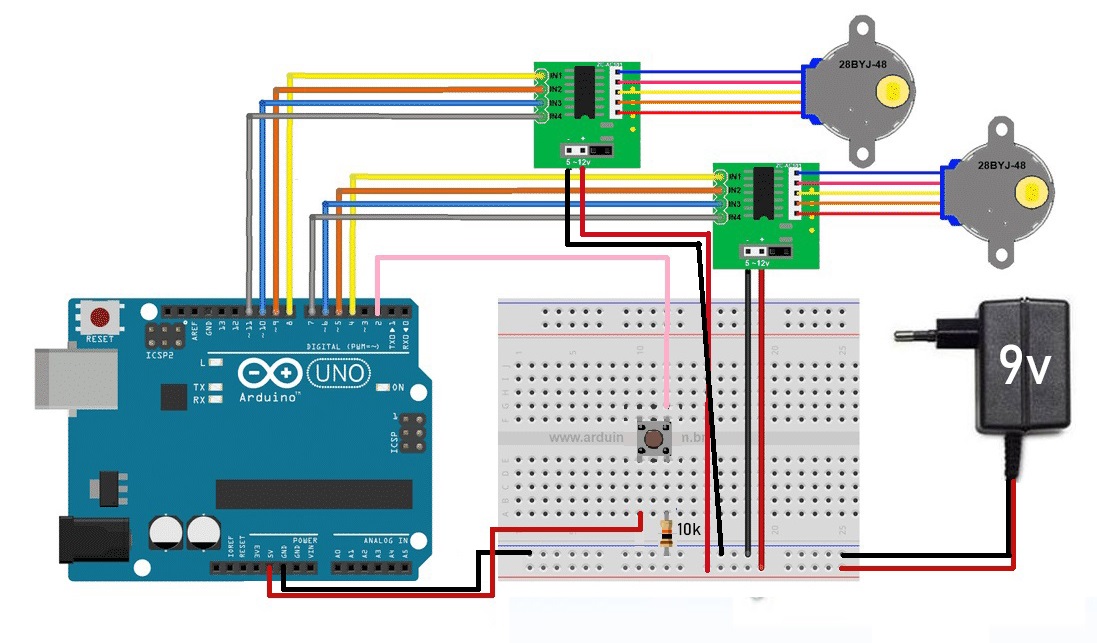
3RD STEP Add a second motor to the circuit
Some simple changes were made to the code:
// Arduino stepper motor control code

#include <Stepper.h> // Include the header file
// change this to the number of steps on your motor
#define STEPS 32


// create an instance of the stepper class using the steps and pins
Stepper stepper2(STEPS, 4, 6, 5, 7);//second motor
Stepper stepper(STEPS, 8, 10, 9, 11);


const int camera = 2;
int pictureTaken;
int pictureTaken2; // second motor
int buttonState = 0;

void setup() {
  Serial.begin(9600);
  pinMode(camera, INPUT);
  stepper.setSpeed(200);
  stepper2.setSpeed(200);//second motor
}

void loop() {

 buttonState = digitalRead(camera);

 if (buttonState == HIGH) {
   Serial.println("Motors On!");
   pictureTaken = 256;//number of steps the motor makes after camera shot
  // (1/8 of a rotation)
   pictureTaken2 = 512; // second motor
  // (1/4 of a rotation)
   stepper.step(pictureTaken);
   stepper2.step(pictureTaken2);
delay (5);

 }

 else {
   Serial.println ("Motors Off!");
 }


}


